Thursday, September 12, 2013

Down Pillows - Purchasing and Cleaning


A good down pillow can last you a lifetime if you know what to get and how to take care of it.

When shopping, look for 100% down.  Let me repeat, you want 100% down. Not 95% down with 5% feathers.  And, the higher the white down to grey down ratio the better. Ours are 75% white to 25% grey. Also pay attention to the amount of fill. Our standard size pillows are a medium loft and have about 26-28 oz. of fill. Most pillow stores will carry a "gentle, medium or firm" option. A pillow like ours should cost you at least $100. While you are purchasing your pillow you should also be getting the best pillow protector you can find. Go ahead and pay the money. You will have it almost as long as the pillow (we started replacing ours after about 10-12 years.)

Before you do anything, wash and iron the pillow protector and put it on the pillow. Next, throw the whole thing in the dryer on hot for 15 minutes. It is ready for the pillowcase and your bed!  

Now, every time you change your sheets, throw the down pillows in the dryer while the sheets are washing. They should fluff back up to their original size. When they don't, the pillows have absorbed enough of your body oil to need washing.

Don't be afraid. We wash our pillows once a year and have been using them for 16 years now. Just make sure you leave the pillow protector  ON while washing. Here is a pile I did the other day.


Check for stains first. You can spot clean the pillow protector or, if it is really dirty, take it off, wash & dry and put it back on the pillow before washing.


 I use my regular detergent along with a little Oxiclean and run them on a warm wash/cold rinse. When you open the dryer you will be amazed. It is kind of like washing a fluffy cat - there's not much there when they are all wet.


Washing is the easy part.   Drying them takes several hours.   Toss them in the dryer with a tennis ball or those fancy rubber dryer balls and set it on warm/hot for 60 minutes. (Note: I can put two standard in the dryer together but I need to do the king size pillows one at a time.) Check them and fluff some more.  After they have puffed up again, I take mine out to sit in the air for awhile and then give them a good squeeze to see if they are still moist.  If so, back in they go for a little longer.  Since the pillow protector was on, it is usually clean and wrinkle free. You can take yours off and iron it at this point if needed.


A note about pillow allergies: It has been our experience that many, if not most, people who are allergic to feathers, have no problem with our down pillows. And, we have found that a lot of people who think they have "down" allergies do not react to our pillows. It may be their experience was either with pillows that had that 5% feather content mentioned above or they had slept on pillows not cleaned regularly.

Tuesday, July 30, 2013

Beaded Sun-Catchers


Charlie & Cathy, long time regulars here at the inn, are responsible for quite a few of the goodies you see around the grounds. It started some years back when Cathy was taking a class making flower pots out of peat moss. I wondered if it would be similar to plans I had torn from a magazine for constructing giant concrete leaves. She decided we should  give it a try. They turned out great.  I kept the one in the round bed out front and gave the rest away as gifts.


Since then, occasional homemade additions show up; the tree bench out back, a smaller bench in the woods, and the mirrored gazing ball out front are all "C&C" originals.

This summer, Cathy found the bead sun-catcher idea on Pinterest. She collected inexpensive beads from different craft stores, I took apart some old jewelry and Charlie went to his wood shop to make us some hangers.


The wood hanger is about 15" long with a groove routed in the top the accommodate the lead weights we used as stops. Twelve holes were drilled for the fishing line and an extra hole was drilled at each end for the cable wire hangers. The 50 lb fishing line was cut into 12 strips about 20" long with a  round lead weight tied to one end.  The other end was fed through a hole and the beads were strung on and finished off with (fishing) slip sinkers to weight it down.


Cathy found the she liked having some beads that weren't clear that showed up better when the sun wasn't shinning and that she needed the blues, pinks and reds to stand out from all the green in the yard.  When we first hung this outside, the hummingbirds kept coming around to check it out!


I made one a little differently.  I had some old round metal buttons that were tied to one end of the string. Smaller beads from an old pair of dangley earrings that I really liked were mixed in with some of the bigger beads.  I only made five strands and hung them from an old small metal embroidery hoop (it took about five hands to get it lined up and snapped into place.


Mine has too many green beads to show up well outside so I have it hanging in the bathroom so I can enjoy it while soaking in the tub.

I have seen lots of versions of these online.  I liked the one done hanging from driftwood that had the occasional seashell mixed in.  Cathy said she was going to start checking out flea markets and garage sales for fun costume jewelry to use. If you make some, post pictures here so we can enjoy them!

Friday, May 17, 2013

Mountain Thyme's Vegetable Cream Cheese


I have long been a fan of vegetable cream cheese on bagels and came up with this recipe trying to recreate some we used to get at a restaurant back in Dallas.  Since opening the B&B, we find that we use it in many different ways.  We still serve it on bagels for breakfast but have tried it these other ways as well:

          ~ Cut cucumbers in very thin slices and spread it in between for "sandwiches"
          ~ Fill sticks of celery (these first two are great for low carb diets!)
          ~ Set out as a dip for chips or a spread for crackers
          ~ Roll up with tortillas and ham or turkey slices.  I usually add a little dill when I serve it this way.


Mountain Thyme Vegetable Cream Cheese Recipe

2-3 radishes, cut in large pieces
2-3 green onions, chopped
1/4 bell pepper, diced
2" inches of cucumber, peel and remove seeds
1 8oz pkg cream cheese
dash of garlic powder


If you use a food processor, you can chop the vegetables in large pieces (first picture). Otherwise, you will want to finely dice all (see second picture below).


After chopping, transfer vegetables to a strainer, add a generous pinch of course salt, stir and let sit and drain for 30 minutes.  This helps remove excess moisture. 


Dab with paper towel and mix with the cream cheese.  This keeps for at least a week covered in the refrigerator.

It is great to pull out for mid-afternoon nibbles with some carrot slices. And, as stated above, we use it lots of different ways with our snack trays, holiday gatherings and picnics!


Thursday, February 28, 2013

Valentines


Every year we pull out all the stops for Valentines.  We spend months planning & making the handmade  souvenir menus, deciding on table and room decorations and perfecting the recipes. Since many of our guests come year after year, we try to have something a little new each time.


This was a red and white year with lots of stripes and hearts ...


and polka dots.


This couple brought a little style to the event (this is only the second tuxedo in over a dozen years!)


Last year we did a sparkly blue and white snowflake theme.


Next week I will post a tutorial on making the menus and table decorations we had this year.

Tuesday, January 15, 2013

Fun with TP Rolls

If life gives you lemons.....

Or toilet paper rolls.  As an innkeeper of a house with 11 bathrooms, we have tons of those!  So, when I see ideas on Pinterest for things to do with TP rolls, I "Pin It."  I saw several versions on this theme but this is the simplest.

Cover the roll in peanut butter,


roll it in bird seed,


and stick it on a branch.


The first time we put them out, the birds were suspicious and hesitant to try them.  I set a covered roll in each one of their regular feeders and they quickly caught on.  The seed "pods" are all up and down the holly bushes lining the porch, making for great bird-watching from the dining room. The birds love it as they have more feeding stations when the weather make foraging difficult.

I went ahead and made several of them and stuck them in the freezer so they are ready when I need them without all the mess.


One site has you add a string, which wouldn't work as well for me but is great if you have accessible tree branches.


This idea from Martha Stewart could be fun to try with my miniature bundt pans. They could be adorned with ribbons for the holidays and given as gifts to bird-watching friends. If and when I do it, I will post results.


Tuesday, January 8, 2013

Making Menu Cards


 I was working on our menu cards for this year's Valentines Dinner, (you will have to wait until later to see this one), and I thought it might be fun to drag out the ones from years past and have a look.  You might get some fun ideas for a party or event you are planning.  I must say I am glad these were made pre-Pinterest days.  Seeing some of the marvelous examples out there, I might have been intimidated to ever try.

Speaking of Pinterest, and I know from several funny blogs out there I'm not alone on this, we need to get over our "Pinterest Perfection" expectations.  More on this next week when I show you pictures of my cinnamon twist that needs some practice.

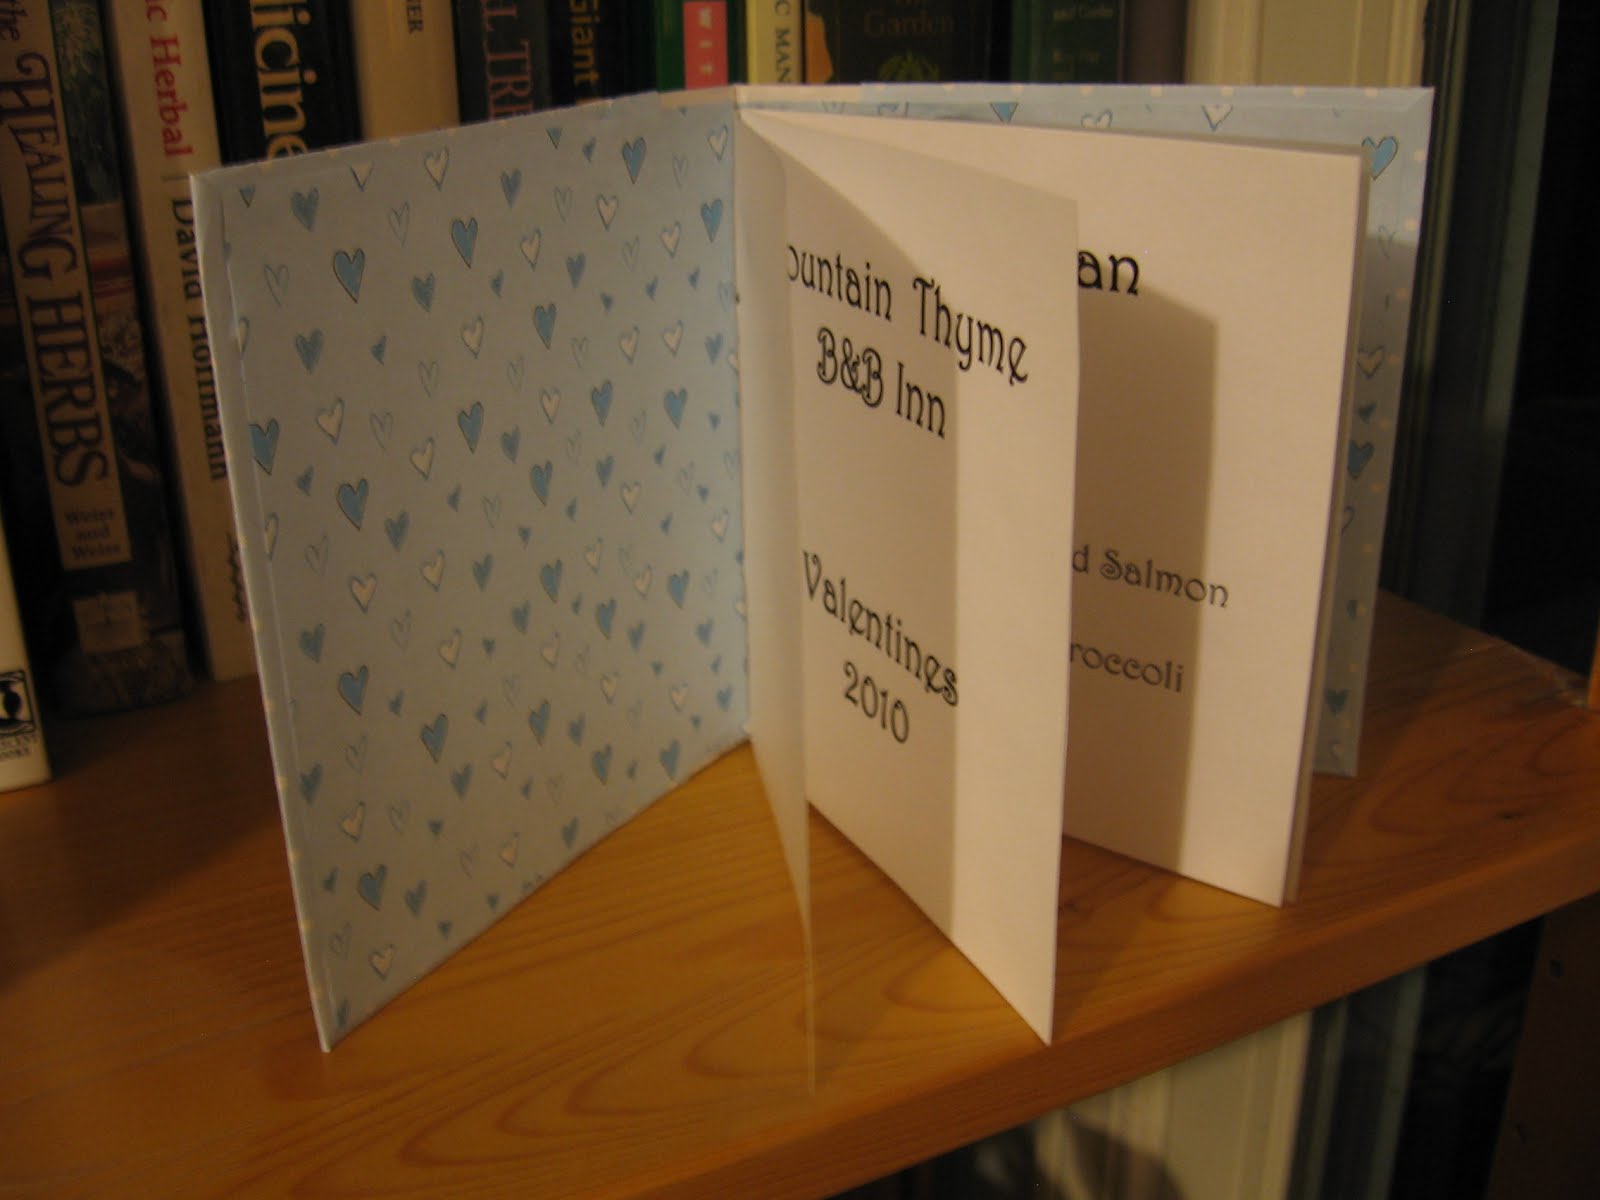
That first year that we started offering the Valentine's candlelight dinners, the printed menu was an afterthought, hurriedly printed off the day before. It was simply red cardstock for the cover, white printer paper for the lining, black type, some gold stamp ink and stretchy red/gold package twine left over from Christmas wrapping. It turned out to be a fun little souvenir that folks enjoyed from their romantic weekend out.
The next year I spent some time thinking about it and came up with something a little fancier. We alternate color schemes each year between red and blue (winter, snowflakes, etc). I started with a smokey blue velum for the cover. I cut out a heart template to place on top and then stamped snowflakes with white ink inside. I finished off the design with a running stitch-like border with a white colored pencil.
The inside was simply a white cardstock trimmed with scalloping scissors. The snowflakes inside were stamped with a denim ink and the pages were held together with a thin smokey blue ribbon with a tiny 3D snowflake tied to the tip
Another red themed menu was a thick, textured red card stock, folded over at the top, the edge coarsely torn, holes punched through red and white cards, and tied with multicolored pink & red embroidery thread. The red border and hearts between courses printed off the computer and the stamps were left over from previous years. (You can ignore the snowflake imperfection shown here --  I always keep the rejects for my scrapbook). The place cards were cut from the same paper and hand decorated.

This next attempt was a little more time consuming.  I took my inspiration from a little book that was made for my mother's high school graduation. You start with two pieces of card board. The silver strip paper was glued to both pieces to bind the book. The polkadot paper was glued to the outside of each piece of cardboard, leaving an inch of silver stripe showing, and wrapping 1/2 inch around the other sides. The inside of the cardboard was covered with contrasting heart paper. (I used a glue stick for most of this but had to reinforce  a few spots.)
The pages inside consisted of one sheet of frosted velum and two sheets of light weight cardstock. The first page was the title with the individual menus on the center pages. The silver snowflake on the front was a rub-on decal and the pages were bound to the cover with silver ball/string that I cut off the edges of some wired ribbon.

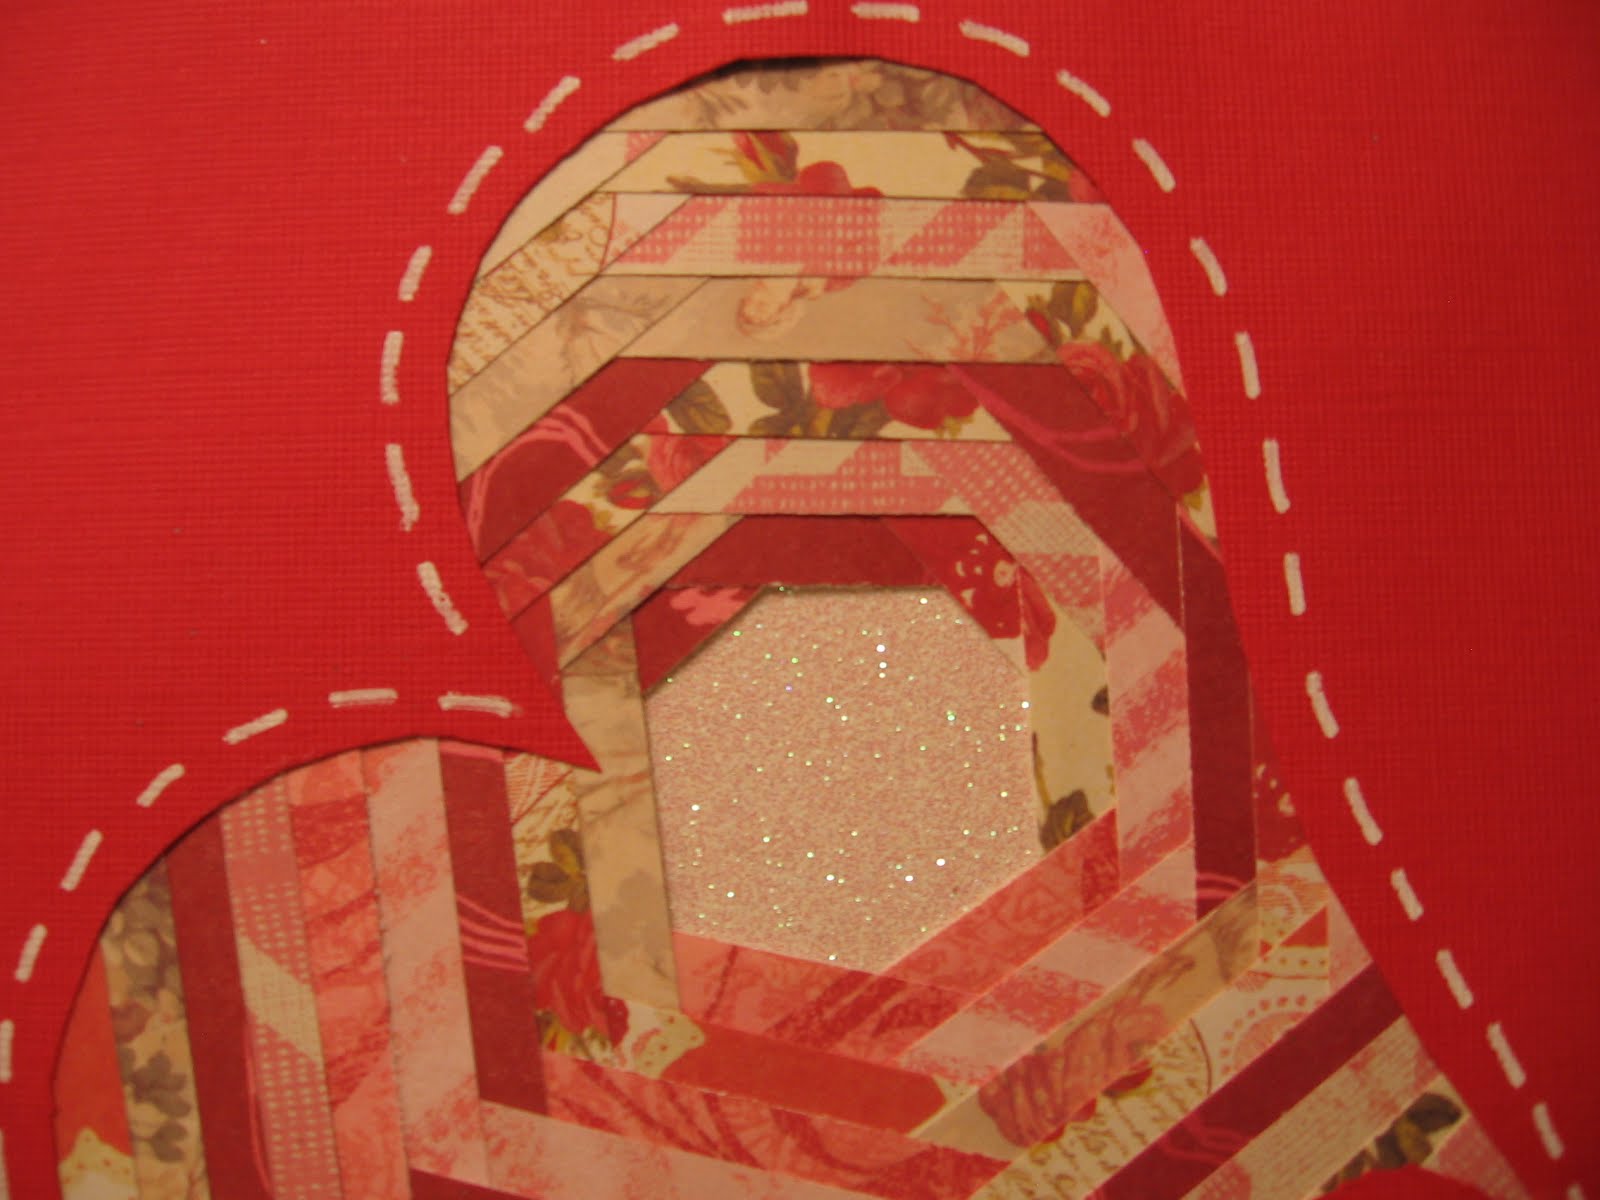
This card was inspired by a handmade Christmas card. It is simple but time consuming. But, it allowed me to use up lots of the red, white, and pink papers I had from years before. It is kind of like making a log cabin quilt. Strips of paper are just laid on and glued around a sparkly sheet of paper until there is enough to fill up the space. I used the white colored pencil to "stitch" around the edge.  Another sheet of red is glued to the underside to keep the quilt in place and finish off the inside. The inside was printed on white card stock and held in place with little sticky snowflakes
The idea for this card came to me from a handmade wedding invitation. The base of the menu and the name card are cut from a textured blue card stock.

The white menu is printed in blue ink to match the ink I had for the snowflake stamp. (It has been used many times in many colors). The velum surrounding the menu and layered on the name card was frosted with little glittery speckles (which are hard to see here). The menu was tied with frosted ribbon with a little snowflake stamped heart. The layers on the name card (after being glued together) are accented with sticky snowflakes.
This next menu got its inspiration from some wonderful thick handmade paper I got in Dallas. If you love paper and if it is still there, check out a place called Paper Routes. You will think you have died and gone to heaven.
I came up with a cone shape that resembled a heart when rolled up. The cone is tied closed with ribbon in two small hole punched in the front. The name cards were simple heart shapes. The white linings for the menu and place cards (heart shaped) were hand torn to fit the shape. (Just pencil the shape on the back side of the paper and gently tear along the line). Inside the cone, the top heart was placed to peak out the top and the two menu cards were lower and overlapping.  The little red hearts were the old fashioned lick & stick foil kind.
Last year I wanted to try making fun tissue paper flowers that I was seeing all over Pinterest. It was simply pale blue card stock, glittery wide ribbon, white card stock cut with those scollop scissors and a blue carnation glued on. The names were hand lettered on the front. The interior was printed computer except for the snowflake stamps.
My favorite was an original design. My friend, Janie, and I wanted a formal looking menu for our 10th anniversary. (We opened Valentines weekend, 1998). When we decided on a tuxedo, the rest was just cutting and pasting paper until we came up with something we liked.


The pinstripe is a light weight paper.  Heavy card stock would have been better but I couldn't find anything that worked.  The red for the vest and the white accents are heavier paper. The vest buttons were stick-on white hearts and the red flower in the jacket are red berries on green wire (floral dept) that we stuck through the paper and covered with red hearts front and back.  The menu is held together with that "repositionable" glue.  The name cards were made by taking two hearts, cutting a slit half way up the bottom of one and half way down the top of the other.  Holding the two perpendicular, slide the bottom slice on top of top slice. Glue the white heart on to create a 3D standup.

I hope these inspire you to greater things. I'm sorry I didn't have pictures of the process but these were made pre-blog.  I will do a better job of documenting this year and will share the results in March after all the dinners are over.