At the inn we have a closet where we provide things a guest may need. We call it "The Stuff Closet." My intention for this space is similar. I want to share all kinds of stuff about our life here at Mountain Thyme: stuff about cooking, cleaning, decorating and entertaining and interesting stories about our pets and our guests. I hope it will be stuff you can use, or at least enjoy reading about.
Showing posts with label Recipes. Show all posts
Friday, March 14, 2014
Orange Creamsicle Meringues
We occasionally get requests for Eggs Benedict and, I must admit, I make a mean Hollandaise Sauce. Since the sauce uses egg yolks only, I will have three eggs whites left over. What is perfect for using up three egg whites?
Meringues!
I absolutely love perfectly done meringue cookies but have seldom succeeded in creating them. Popping one in your mouth and having the crunchy exterior give way to what can best be described as a solid foam that dissolves almost immediately is sublime.
Experiments have been done in this kitchen with numerous recipes; some plain and some with additions of cocoa, chocolate chips and Nutella. But, I think I have finally found a good, all round site for instructions on making these little delicacies: www.thekitchn.com/recipe-meringue-18607
Never before had I been given permission to add alcohol and this has opened up so many possibilities! Since I had half of a fresh orange that needed using, I started there. It didn't take long to decide on Grand Marnier, a wonderful orange flavored liqueur. Before starting the basic recipe, I grated my orange rind in a small bowl (maybe 1 TBLS), covered it with the liqueur (about 2 tsp) and set it aside to marry.
I would post the recipe here but really want you to go to the original site above for easy to follow meringue steps. These little guys can be tricky and this author does a great job of describing the process (and I have seen a few who did not!). When you get to "Add flavorings," whip in the mixture above. If you want them to be a stronger color, add more than the three drops of orange food coloring I did.
I love the fresh taste of the citrus. I may try lemon next time. Enjoy!
Friday, May 17, 2013
Mountain Thyme's Vegetable Cream Cheese
I have long been a fan of vegetable cream cheese on bagels and came up with this recipe trying to recreate some we used to get at a restaurant back in Dallas. Since opening the B&B, we find that we use it in many different ways. We still serve it on bagels for breakfast but have tried it these other ways as well:
~ Cut cucumbers in very thin slices and spread it in between for "sandwiches"
~ Fill sticks of celery (these first two are great for low carb diets!)
~ Set out as a dip for chips or a spread for crackers
~ Roll up with tortillas and ham or turkey slices. I usually add a little dill when I serve it this way.
Mountain Thyme Vegetable Cream Cheese Recipe
2-3 radishes, cut in large pieces
2-3 green onions, chopped
1/4 bell pepper, diced
2" inches of cucumber, peel and remove seeds
1 8oz pkg cream cheese
dash of garlic powder
If you use a food processor, you can chop the vegetables in large pieces (first picture). Otherwise, you will want to finely dice all (see second picture below).
After chopping, transfer vegetables to a strainer, add a generous pinch of course salt, stir and let sit and drain for 30 minutes. This helps remove excess moisture.
Dab with paper towel and mix with the cream cheese. This keeps for at least a week covered in the refrigerator.
It is great to pull out for mid-afternoon nibbles with some carrot slices. And, as stated above, we use it lots of different ways with our snack trays, holiday gatherings and picnics!
Thursday, August 16, 2012
Dill Eggs in Puff Pastry
When we lived in Dallas, we used to frequent a breakfast place called Le Peep (it may still be there) and we had a favorite dish called Country Cool. It was scrambled eggs, cream cheese, ham and dill. We have tried to recreate that and make it a little fancier by wrapping it in puff pastry. The eggs are great by themselves if you don’t have or don't want the pastry.
Dill Eggs
5 eggs lightly whipped, reserving 1 Tbsp. for egg wash.
1/2 tsp. dill
4 oz cream cheese
1 tsp. unsalted butter
1/4 c. finely diced shallots
1/2 c. diced ham
1 puff pastry sheet (found in frozen food section)
Egg wash
1 Tbsp. egg
1 Tbsp. Water
You can sprinkle on toasted sesame seeds, if you want.
Night Before: (This is optional, but the scrambled eggs are easier to work on the pastry sheet later if they have been chilled.) Lightly whip dill into eggs. Cut cream cheese into medium chunks. In large saucepan, saute shallots in butter. Stir in ham. Add dill eggs and stir until softly scrambled. Remove from heat and immediately stir in cream cheese until almost melted and blended. Set aside, or cover and refrigerate overnight.
Dill Eggs
5 eggs lightly whipped, reserving 1 Tbsp. for egg wash.
1/2 tsp. dill
4 oz cream cheese
1 tsp. unsalted butter
1/4 c. finely diced shallots
1/2 c. diced ham
1 puff pastry sheet (found in frozen food section)
Egg wash
1 Tbsp. egg
1 Tbsp. Water
You can sprinkle on toasted sesame seeds, if you want.
Night Before: (This is optional, but the scrambled eggs are easier to work on the pastry sheet later if they have been chilled.) Lightly whip dill into eggs. Cut cream cheese into medium chunks. In large saucepan, saute shallots in butter. Stir in ham. Add dill eggs and stir until softly scrambled. Remove from heat and immediately stir in cream cheese until almost melted and blended. Set aside, or cover and refrigerate overnight.
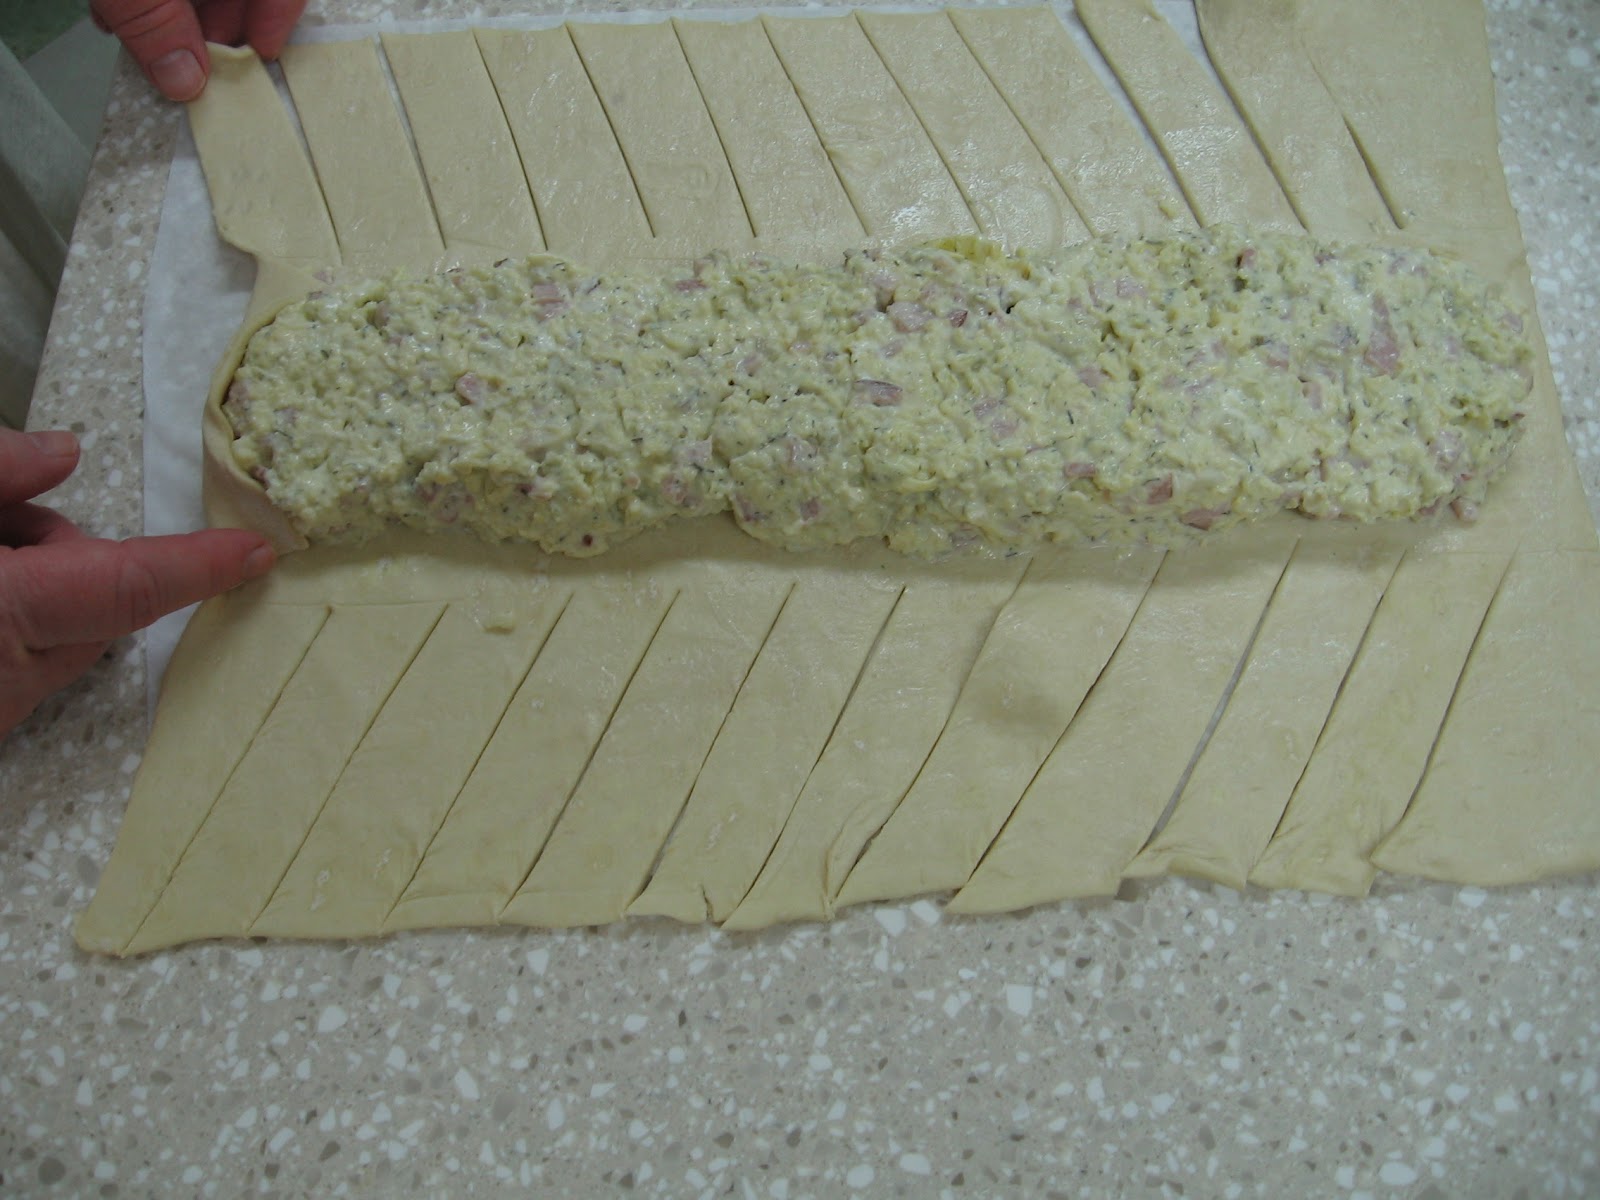
Final Preparation: Roll out pastry sheet on wax paper or cutting board to 14 inches by 18 inches. Spoon egg mixture onto center of pastry sheet leaving 2 inches of pastry bare at top and bottom and 4 inches bare along both sides.
Fold the 2-inch top and bottom over the filling. Then go down both the 4 inch sides cutting the bare pastry at 1/2 inch intervals from the edge up to the filling. This creates a series of 1/2-inch strips down both sides.
Beginning at one end fold one strip over filling from left, then one from right, alternating sides until all pastry covers the filling.
Brush with egg wash. Place on cookie sheet lined with parchment paper or silicone mat. Bake 20 to 30 minutes at 400~ until golden brown.
Allow cooling 4 minutes before slicing.
Serves 4-6
Thursday, June 28, 2012
Strawberry Stuffed French Toast
A favorite here at the B&B is this wonderful, and easy, French toast breakfast. The key is to prepare the first step the night before so the bread and cheese have a chance to meld together.
1 loaf French bread
8 oz cream cheese at room temp
3 Tbls butter at room temp
2 Tbls strawberry jam
9 eggs
1 1/2 cups milk
1 tsp sugar
1 tsp vanilla
The night before:
Cream the butter, jam and cream cheese together. Slice the French bread length-wise like you are making a sub sandwich.
Flatten out the bread and spread on the cream cheese mix.
Fold the bread back together, place back in the store wrapper, and refrigerate overnight.
In the morning:
Mix together the milk, eggs, sugar and vanilla and place equal amounts in two 9x11 casserole dishes (or any shallow dish with a lip).
Slice the loaf in 1/4 to 1/2 pieces and soak in mix (both sides). Depending on the size of loaf and size of slice, this will feed 6-8 people with two slices per person.
Grill in a slight amount butter/oil until brown on both sides.
We serve a couple of pieces on the plate topped with a spoon of strawberry syrup, a spoon of fresh diced strawberries and a sprinkle of powdered sugar.
Tuesday, June 12, 2012
Killer Deviled Eggs
The real name of this recipe is Curried Deviled Eggs but I wanted all of you afraid of the word "curry" to give me a chance before discounting. There is a spicy sweetness to curry powder that brings out the best in a deviled egg. Next time you make this or any recipe, put a pinch in the yolk mix. I bet you put two pinches in the next time!
Note: Curry Powder is a blend of spices and the recipes for the blend are as varied and contested as the best recipe for Potato Salad in the South! If you find you like using the store bought variety, check out the Internet for other blends to try. Mom used to make up her own which is much better (but I have lost her recipe!)
6 hard boiled eggs (see previous blog on egg salad for great egg boiling technique) peeled, cut in half and yolks removed.
Blend with yolk:
2-3 Tbsp of mayo
1-2 tsp Wickles pickle relish (or any sweet relish)
1/4 tsp curry powder
pinch of salt
I don't ever measure out my recipe. I just add stuff until it is creamy and spicy enough for my taste.
If you want to take these on a picnic, place the egg whites in a plastic container and spoon your yolk mix into a zip-lock baggie. When you get to where you are going, snip off a small corner of the baggie and squeeze. It is an easy way to fill the eggs and you don't have to worry about messing them up in transport.
Tuesday, May 1, 2012
Almond Joy Cookies
This is just one of many recipes you can create with a box of brownie mix.
Recipe:
1 box brownie mix (app 4 cups)
1/2 cup vegetable oil
2 eggs
1 Tbsp water
1 cup coconut
1/2 cup slivered almonds
In a large measuring cup whip together eggs, oil and water. Pour into bowl with brownie mix and stir until all is moist. Add coconut and almonds and set in fridge for 30 minutes. Scoop out with mini ice cream scoop (or spoons) onto cookie sheet. Cook at 350 for 11 minutes.
Notes:
I sometimes add a few drops of coconut extract to the dry coconut. (I stir them together in a small bowl that I set aside for a few hours before making the cookies.)
Also, I toast the almonds. Some people like to do this on the stove top in a skillet, but I just put them in the microwave in a shallow glass bowl and heat on high for 60 seconds
This basic recipe (brownie mix, oil, eggs & water) is the perfect start for all kinds of fun combinations. I will share more of mine in the future but until then, have fun experimenting!
Tuesday, April 24, 2012
World's Best Egg Salad
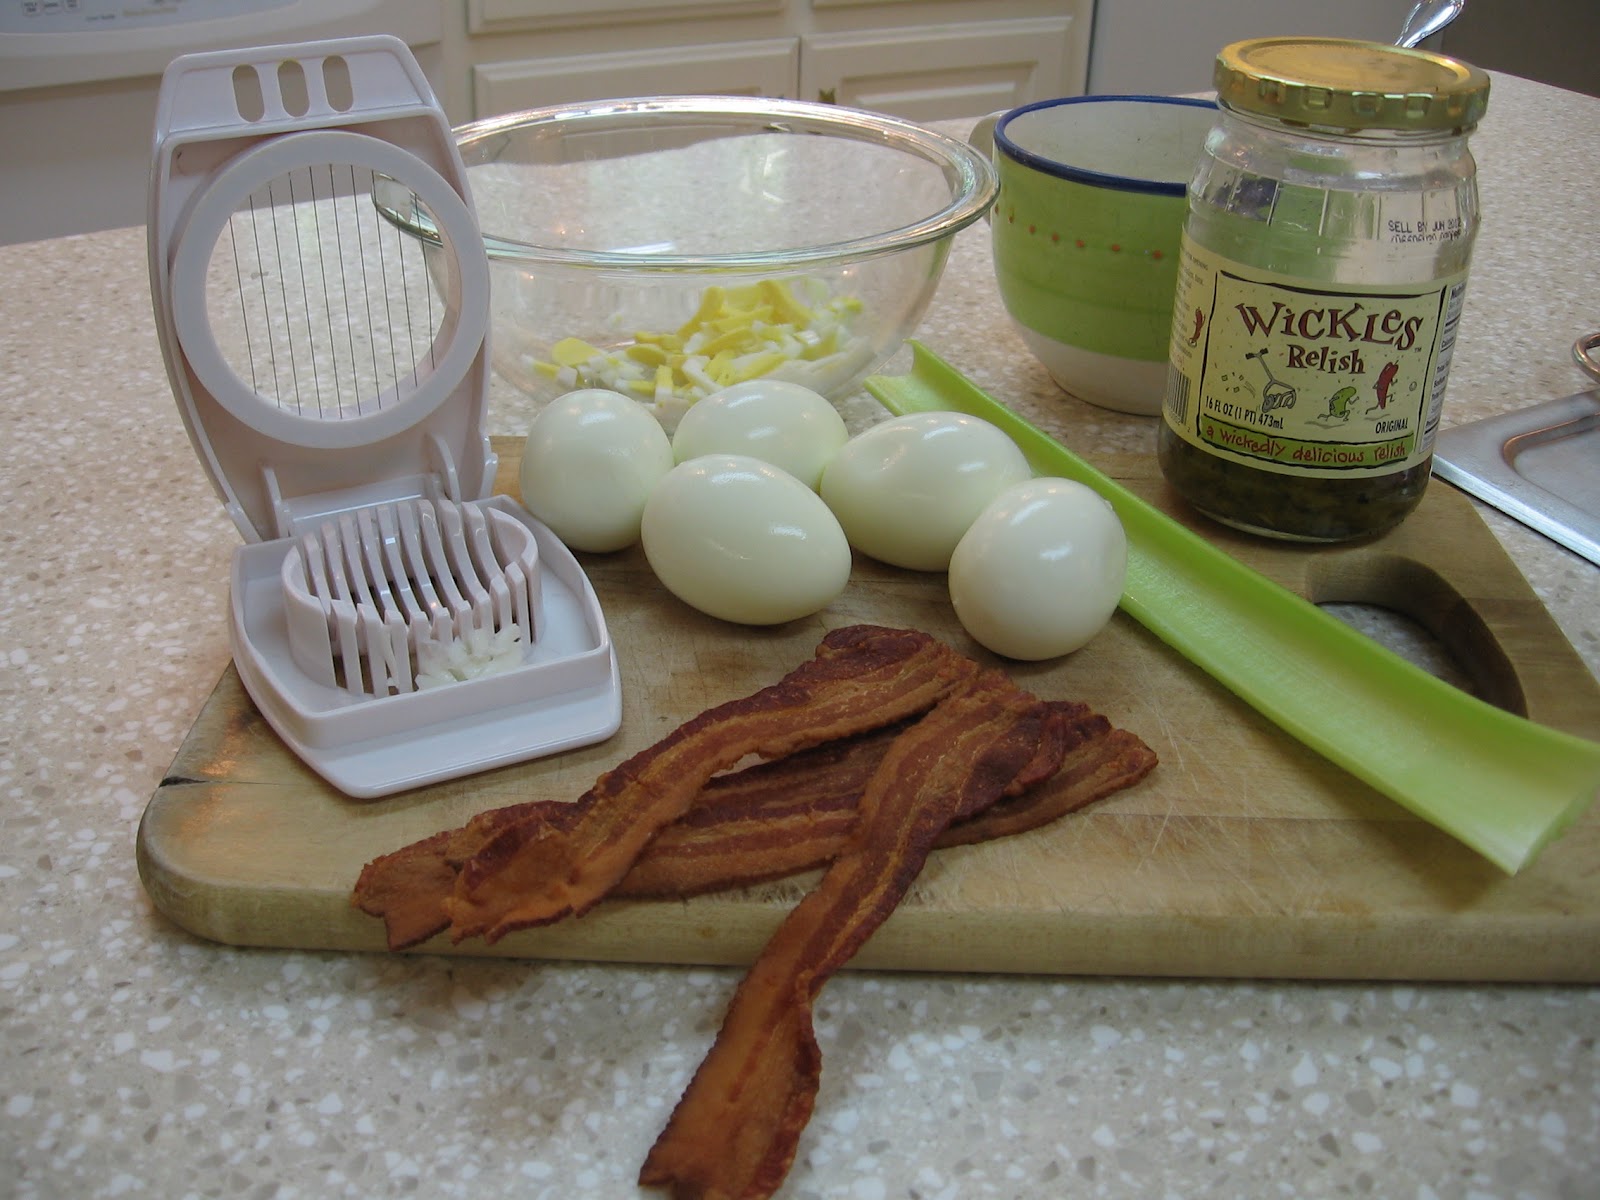
I've been eating egg salad since I was a kid and love it. On occasion, I would order it at a deli or try some at a reunion spread and was always disappointed. How can you make egg salad without BACON? If you have never (I'm so sorry) had egg salad without bacon, make up some of this right away and have it on toasted wheat bread. You can thank me later!
But first we need to boil some eggs. I have long gone by the 15 minute rule but found a site on Pinterest that had even better hints. I tried it and it worked great:
~ Place eggs in heavy saucepan and cover with cold water.
~ Bring to a roiling boil.
~ Cover, turn off heat and set timer for 15 minutes.
~ Pour off hot water and cover in ice water (I put in sink and cover with ice and add water). If all the ice melts, add more) for 15 minutes.
~ Put eggs back in heavy pan, cover and SHAKE. Keep shaking...side to side and up and down.
~ The eggs should now be cover in lots of tiny cracks and the shells with come right off!
Recipe:
1 dozen boiled eggs, peeled & diced
8 slices of bacon, cooked crisp & crumbled (don't even think of using bacon bits!)
2/3 cup celery, finely diced (about 2 med sticks)
1 Tbls Wickles pickle relish (or sweet relish)
1 cup mayo
1Tbls cider vinegar
1 pkt sweetener (or 2 tsp sugar)
1 tsp mustard
salt & pepper to taste
In a large bowl, mix together the eggs and first three ingredients. Combine the mayo and last ingredients for the dressing and mix in with the salad. Chill for at least four hours (overnight even better) and serve on toasted bread or with crackers on a bed of lettuce.
Tuesday, April 17, 2012
Protecting and Storing Recipe Cards
You will notice the stains and tears on old envelopes...time to make new ones!
It seems like it is impossible to keep cookbooks from getting stained when used often. Add to that our problem of needing to adapt recipes for 2 to 16 people and you quickly discover a system to help you manage the kitchen chaos.
First, Mike went through and made tables for all the recipes we use often and broke then down into increments. If it could be made individually, it made a table for 2,4,6, etc. If it was a casserole, the table was for 4,8,12,16 (sizes for different combos of baking dishes). This make it SOOO easy when you are cooking breakfast and haven't had all the coffee you really needed!
Next, I laminated them all with our handy-dandy laminating machine (one of the best investments I made for this place.) Or, you could take your cards to a local quick print shop. Most offer laminating service.
At first, this was enough. But, as the piles of cards grew, it became necessary to corral them somehow. After looking around the office for ideas, the 9x12 inch mailing envelopes made themselves known. Perfect size since we had printed recipes on half pages of card stock (4 1/4" X 5 1/2")
Cut off the bottom 6" of the envelope.
Reinforce the top with a strip of clear packing tape. I just wrap the extra around to the back but you could seal both sides if you like.
Cut out a tab across the front, staying inside of the area that is taped.
Label the pockets and file in a handy drawer.
We have separate envelopes for "First Course," "Second Course," "Snacks," "Breads," and "Misc."
Thursday, March 8, 2012
Fresh Gingersnaps
Remember that ginger that we froze in the last blog? Set it out now and preheat the oven to 350.
Mountain Thyme Gingersnaps
2 cups all purpose flour
1 tablespoon fresh grated ginger
(you can add more fresh or 1 tsp dried ginger for snappier snaps)
2 teaspoons baking soda
1 teaspoon ground cinnamon
1/2 teaspoon salt
3/4 cup shortening
1 cup sugar
1 egg
1/4 cup dark molasses
Combine the flour, ginger, baking soda, cinnamon, and salt into mixing bowl.
Place shortening into a mixing bowl and beat until creamy. If you are't aware, they now have this in stick form for easy measuring. Do not use the butter flavored kind for this recipe.
Gradually beat in white sugar.
Beat in the egg and dark molasses.
Add 1/3 of flour mixture into the shortening mixture; stir until thoroughly blended. Sift in the remaining flour mixture, and mix together until a soft dough forms.
Pinch off small amounts of dough and roll into 1 inch balls. Roll each ball in cinnamon sugar mix, and place 2 inches apart on ungreased baking sheet.
Bake about 9-10 min until tops are rounded and slightly cracked. Cool and store in airtight container. These, when cooled, are slightly chewy. If you like your snaps crunchy, cook a bit longer.
NOTE: We keep a cinnamon/sugar mix on hand for several recipes. Since we make these a lot, I have a tupperware bowl in the pantry for just this use. I can put a dozen cookies in at a time and shake to coat. Also, I store the extra dough, rolled in a ball and wrapped up in plastic wrap. It keeps in the fridge for a week or in the freezer for longer.
Thursday, February 23, 2012
Quick & Easy Chocolate Toffee Stuffed Brownies
The hardest part of this recipe is waiting for them to cool!
Preheat oven to 350. Line a 9x13 glass pan with foil so it comes up all the way around all edges and grease.
Prepare two batches of brownine mix per instructions on the box. I buy the Duncan Hines in the bulk size (4 packets per box) Pour half into pan and smooth out. Take three 6.8oz Hershey's Symphony Milk Chocolate Almond & Toffee Chip bars and place on top (I usually diagonally cut the slightest bits off the outside corner to accommodate for the curve in the pan. Again, you will be obligated to eat those little bits as not to waste anything. The bars in this photo are the smaller version because Mike didn't realize there were two "big" sizes so no cutting was required)
Spread the remainder of the brownie mix over the top and cook for 40-45 minutes. Set out to cool completely. After several hours, I lift the foil out, cut off what I am serving, re-wrap the foil over brownies and place in a ziplock bag in the pantry for a day or so, refrigerator for the week or freeze for later on. Ideally, I prepare these the day before so they have ample time to set up. If you cut into them to early, you will need to eat with a spoon!
Note: You can make smaller batches in a 9x9 with one box of brownie mix and smaller candy bars. Also, play around with the stuffings. There are dozens of large candy bars now...dark chocolate, mint, coconut, etc. Or try sprinkling in goodies like nuts and peanut butter chips. Let me know if you come up with a great one.
Preheat oven to 350. Line a 9x13 glass pan with foil so it comes up all the way around all edges and grease.
Prepare two batches of brownine mix per instructions on the box. I buy the Duncan Hines in the bulk size (4 packets per box) Pour half into pan and smooth out. Take three 6.8oz Hershey's Symphony Milk Chocolate Almond & Toffee Chip bars and place on top (I usually diagonally cut the slightest bits off the outside corner to accommodate for the curve in the pan. Again, you will be obligated to eat those little bits as not to waste anything. The bars in this photo are the smaller version because Mike didn't realize there were two "big" sizes so no cutting was required)
Spread the remainder of the brownie mix over the top and cook for 40-45 minutes. Set out to cool completely. After several hours, I lift the foil out, cut off what I am serving, re-wrap the foil over brownies and place in a ziplock bag in the pantry for a day or so, refrigerator for the week or freeze for later on. Ideally, I prepare these the day before so they have ample time to set up. If you cut into them to early, you will need to eat with a spoon!
Note: You can make smaller batches in a 9x9 with one box of brownie mix and smaller candy bars. Also, play around with the stuffings. There are dozens of large candy bars now...dark chocolate, mint, coconut, etc. Or try sprinkling in goodies like nuts and peanut butter chips. Let me know if you come up with a great one.
Thursday, February 9, 2012
Making Biscotti
Biscotti is/are always available for our guests here at Mountain Thyme. We have tried many recipes from Chocolate-Pistachio to Apricot-Almond but have settled on this recipe as a favorite. It is easy to make and you can always have the ingredients on hand.
3 cups flour
½ cup sugar
½ cup brown sugar
1-pkg HEATH Milk Chocolate Toffee bits
2 tsp baking powder
½ tsp salt
4 eggs
1 tsp vanilla
½ cup vegetable oil
Combine the first six ingredients in a large bowl and set aside. In a smaller bowl, (or large measuring cup) , hand whip eggs until blended, then stir in oil and vanilla. Pour into dry mix and stir until blended. Don't overwork it!
Making biscotti used to intimidate me until I did it a few times under my mom’s supervision. This recipe is very easy and straightforward but it helps to have a “feel” for how crumbly the dough can be. It needs to be just moist enough to stick together when pressed.
The oilier it is, the more it will flatten out during the first baking. Every time I make this, it comes out a little differently, (too dry or too moist). I have gotten in the habit of leaving a little bit of oil in one bowl and flour in another so I can make adjustments once I start mounding the loaves.
Divide the dough into thirds and form logs on you baking sheet lined with parchment. (I am using the reuseable kind in this photo)
First baking is for 20 minutes in a 350 oven. They should be browned and cracked on top.
The real trick is you DO NOT touch the first baked loaves for at least TWO HOURS after they come out of the oven! Do not move them to a cooling rack. Do not shift them around on the cookie sheet. Do not touch them. Just walk away and ignore them until they are completely cool. (Step away from the loaves!) If you don't allow them to cool long enough, all those little cracks will crumble in your hands and you will have...ice cream crumble topping!
At this point, I cut the loaves in half and freeze all but one half, which I cut into diagonal slices and bake for another 10 minutes at 350. Note: those little bits on the ends are too unsightly for company so you will be required to eat those!
I cut these on a slight diagonal for smaller pieces. The greater the angle, the longer the piece will be. When given as gifts, I cut them long, stand them up in a cello bag and tie with a festive ribbon.
Whenever I need more biscotti, I set half a loaf out of the freezer for 15 minutes, slice and bake. The cooked biscotti stores well so there is no reason not to bake it all at once. I just do it so the smell of fresh baking fills the house more often.
Subscribe to:
Posts (Atom)